
Portions adapted from https://happygitwithr.com/ and http://www.cureffi.org/2014/08/27/git-tutorial/
Why Git?
Git is a version control system. It’s original purpose was to help groups of developers work collaboratively on big software projects. Git manages the evolution of a set of files – called a repository – in a sane, highly structured way. If you have no idea what I’m talking about, think of it as the “Track Changes” features from Microsoft Word but much, much better.
Full participation in the bioinformatics community these days practically requires familiarity with Git and GitHub. Most publications include a GitHub repo (or other online repo) of the code used in the project. You will use GitHub to host and share your code as you work on your mini-project and group project. There are also several repo checks throughout the semester to encourage continuous engagement with Git and GitHub. Below are directions on how to install the Git software locally on your computer and a tutorial on how to use it. You should also set up your GitHub account on compbio.cs.luc.edu, where Git is already installed, we will do this together in class.
1. Make a GitHub account and install Git
Go to GitHub.com and register yourself an account. You can have unlimited free public repositories; their business model is based on charging for private repositories. If you use your .edu email address, you can sign up for an education discount which gives you five free private repos. You’ll also need to install and configure git; follow the directions for your operating system.
Git Clients
To most effectively use Git from compbio.cs.luc, we will focus on command line operation, but you are welcome to try a GUI client on your local laptop. Here are some Git client recommendations.
Installing command line Git
Follow these directions for your OS to install git.
2. Introduce yourself to Git
You only have to set this up once per machine. We’ll do the first this on compbio.cs.luc.edu together and then you should do it on your laptop.
On Mac and Linux, open a terminal window and on Windows, open a Git BASH window. Tell git your name and GitHub email by typing (use your own name and email in the single quotes):
git config --global user.name 'Heather E. Wheeler'
- A good option for the above is your actual first name and last name. Your commits will be labelled with this name, so this should be informative to potential collaborators now and in the future.
git config --global user.email 'hwheeler1@luc.edu'
- This must be the email that you used to sign up for GitHub.
The above commands return nothing. You can check that git understood what you typed by looking at the output of:
git config --global --list
Resources:
3. Make your first repo on GitHub
Go to https://github.com and make sure you are logged in.
Click green “New repository” button. Or, if you are on your own profile page, click on “Repositories”, then click the green “New” button.
Repository name: myrepo (or whatever you wish)
Choose “Public” and check the box next to “Initialize this repository with a README.”
Click big green button “New repository.”
Click big green button “Clone or download” and copy the HTTPS clone URL. There is clipboard icon near the right side under the description.
4. Clone the repo to your local computer
Go to the shell (on Mac: Terminal, on Windows: Git BASH).
Take note of what directory you’re in. Use pwd to display working directory and cd to move around.
Clone myrepo from GitHub to your computer. This URL should have your GitHub username and the name of your practice repo. If your shell cooperates, you should be able to paste the whole https://.... bit that we copied above. But some shells are not (immediately) clipboard aware. Type it. Accurately.
git clone https://github.com/YOUR-USERNAME/YOUR-REPOSITORY.git
This should look something like this:
hwheeler@compbio:~$ git clone https://github.com/hwheeler01/myrepo.git
Cloning into 'myrepo'...
remote: Enumerating objects: 3, done.
remote: Counting objects: 100% (3/3), done.
remote: Total 3 (delta 0), reused 0 (delta 0), pack-reused 0
Unpacking objects: 100% (3/3), done.
Make this new repo your working directory, list its files, display the README, and get some information on its connection to GitHub:
cd myrepo
ls
cat README.md
git remote show origin
This should look something like this:
hwheeler@compbio:~$ cd myrepo/
hwheeler@compbio:~/myrepo$ ls
README.md
hwheeler@compbio:~/myrepo$ cat README.md
# myrepohwheeler@compbio:~/myrepo$ git remote show origin
* remote origin
  Fetch URL: https://github.com/hwheeler01/myrepo.git
  Push  URL: https://github.com/hwheeler01/myrepo.git
  HEAD branch: master
  Remote branch:
    master tracked
  Local branch configured for 'git pull':
    master merges with remote master
  Local ref configured for 'git push':
    master pushes to master (up to date)
How does git work?
Here is a diagram of the different zones of your git universe and how different actions affect them.
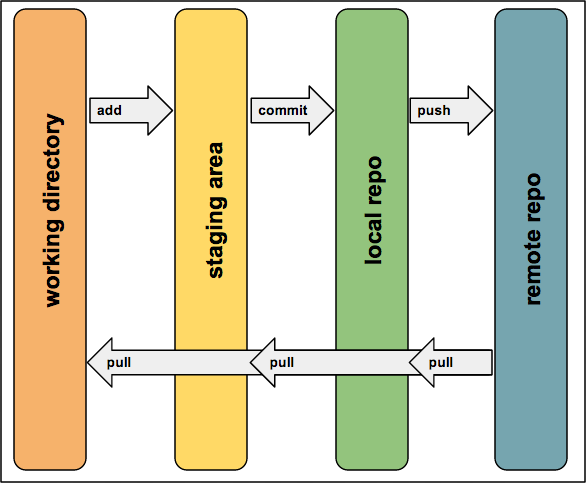
If your needs are relatively simple, then in a typical usage you would:
- Create local files however you like - maybe in your favorite text editor
git addyour changes to be tracked by gitgit commityour changes to your local git repogit pushyour changes from local to your remote repo (GitHub.com)git pullany remote changes to your local repo
5. Make a local change, then: add, commit, and push
Add a line to README and verify that Git notices the change:
echo " Some words I wrote on my local computer" >> README.md
git status
This should look something like this:
hwheeler@compbio:~/myrepo$ echo " Some words I wrote on my local computer" >> README.md
hwheeler@compbio:~/myrepo$ git status
On branch master
Your branch is up to date with 'origin/master'.

Changes not staged for commit:
  (use "git add <file>..." to update what will be committed)
  (use "git checkout -- <file>..." to discard changes in working directory)

	modified:   README.md

no changes added to commit (use "git add" and/or "git commit -a")
Commit this change and push to your remote repo on GitHub.
git add README.md
git commit -m "A commit from my local computer"
git push
This should look something like this:
hwheeler@compbio:~/myrepo$ git add README.md
hwheeler@compbio:~/myrepo$ git commit -m "A commit from my local computer"
[master bf105dd] A commit from my local computer
 1 file changed, 1 insertion(+), 1 deletion(-)
hwheeler@compbio:~/myrepo$ git push
Username for 'https://github.com': hwheeler01
Password for 'https://hwheeler01@github.com':
Counting objects: 3, done.
Writing objects: 100% (3/3), 307 bytes | 307.00 KiB/s, done.
Total 3 (delta 0), reused 0 (delta 0)
To https://github.com/hwheeler01/myrepo.git
   2e0f314..bf105dd  master -> master
If this is the first time you’ve used your account on this particular machine, you will be challenged for your GitHub username and password. Provide them!
6. Confirm the local change propagated to the GitHub remote
Go back to the browser. I assume we’re still viewing your new GitHub repo.
Refresh.
You should see the new “ Some words I wrote on my local computer” in the README.
If you click on “commits” (upper left) you should see one with the message “A commit from my local computer.”
Am I really going to type GitHub username and password on each push?
It is likely that your first push, above, leads to a challenge for your GitHub username and password.
This will drive you crazy in the long-run and make you reluctant to push. On Linux, you can cache your credentials with this command to store your password for ten million seconds or around 16 weeks:
git config --global credential.helper 'cache --timeout=10000000'
You will have to enter your username and password one last time the next time you push, but then you’re set for the semester.
Read more here about how to do GitHub credential caching on Mac and Windows, so you don’t have to type your password in each time.
7. Add, commit, push a script, then change it
Let’s say you’d like to add a solution to the nucleotide counting problem to your GitHub repo. Here’s what mine looks like:
#!/usr/bin/python3
s = open('rosalind_dna.txt','r').read()
a = s.count("A")
c = s.count("C")
g = s.count("G")
t = s.count("T")
print(a, c, g, t)
Open a new file called DNA.py with your favorite text editor, e.g. nano. Copy and paste the code above into this file and save.
#copy the script into DNA.py and save
nano DNA.py
#add, commit, push to your repo
git add DNA.py
git commit -m 'add nt count script'
git push
Refresh GitHub to confirm your script was added.
Now, let’s say you’ve discovered a “more efficient” way to write your python script by using a for loop. Edit your script to something like this:
#!/usr/bin/python3
s = open('rosalind_dna.txt','r').read()
for n in ["A","C","G","T"]:
	print(s.count(n), end=' ')
Check for differences between your local working directory and your GitHub repo.
git diff
Your screen should look something like this:
hwheeler@compbio:~/myrepo$ git diff
diff --git a/DNA.py b/DNA.py
index 98645e6..31909f7 100644
--- a/DNA.py
+++ b/DNA.py
@@ -1,7 +1,4 @@
 #!/usr/bin/python3
 s = open('rosalind_dna.txt','r').read()
-a = s.count("A")
-c = s.count("C")
-g = s.count("G")
-t = s.count("T")
-print(a, c, g, t)
+for n in ["A","C","G","T"]:
+       print(s.count(n), end=' ')
Now add, commit (with a relevant message!!!), and push just like before.
git add DNA.py
git commit -m 'shortened DNA.py with a for loop'
git push
See how things have changed at GitHub.
8. Suggestions for using GitHub in a group
- Designate one member to maintain the primary repository
- All other members fork the primary repository and clone it to their local machine/home directory
- Any changes made by other members can be submitted as pull requests to the primary repository owner
- Primary owner can decide whether to accept the changes or not
- This way, multiple copies of your code will be floating around in case one member does something stupid and deletes their entire repository
Ok, but how do we fork and clone repositories? We’ll do an example below, but see https://help.github.com/articles/fork-a-repo/ for more explanation.
Let’s practice by forking Dr. Wheeler’s repository called DrW_myrepo
First, go to https://github.com/hwheeler01/DrW_myrepo while you are logged in to GitHub and click Fork near the upper right.
From your shell:
#move up one directory from your myrepo
cd ..
#clone YOUR GitHub repo to your local machine/home directory
#after forking, click the green "Clone or download" button and clipboard to copy address
git clone https://github.com/<YOUR-USERNAME>/DrW_myrepo.git
cd DrW_myrepo
#specify Dr. Wheeler's repo is upstream of your copy
git remote add upstream https://github.com/hwheeler01/DrW_myrepo.git
git remote -v
The final command above should look like:
hwheeler@compbio:~/DrW_myrepo$ git remote -v
origin	https://github.com/<YOUR-USERNAME>/DrW_myrepo.git (fetch)
origin	https://github.com/<YOUR-USERNAME>/DrW_myrepo.git (push)
upstream  https://github.com/hwheeler01/DrW_myrepo.git (fetch)
upstream  https://github.com/hwheeler01/DrW_myrepo.git (push)
KEY POINT: Every time you start a coding session in your local forked repository, sync with the upstream branch to get any updates.
To sync your fork with the upstream DrW_repo:
#make sure you are in your DrW_myrepo directory
git fetch upstream
git checkout master
git merge upstream/master
See more details here: https://help.github.com/articles/syncing-a-fork/
Sending a pull request.
How does a group member submit a pull request (change) to the primary group member?
Let’s say you’ve come up with any even shorter DNA.py script and changed the file in your local working directory to this:
#!/usr/bin/python3
s = open('rosalind_dna.txt','r').read()
print(s.count("A"), s.count("C"), s.count("G"), s.count("T"))
Add, commit, and push the change to your forked repo.
git add DNA.py
git commit -m 'shortened DNA.py to 2 lines'
git push
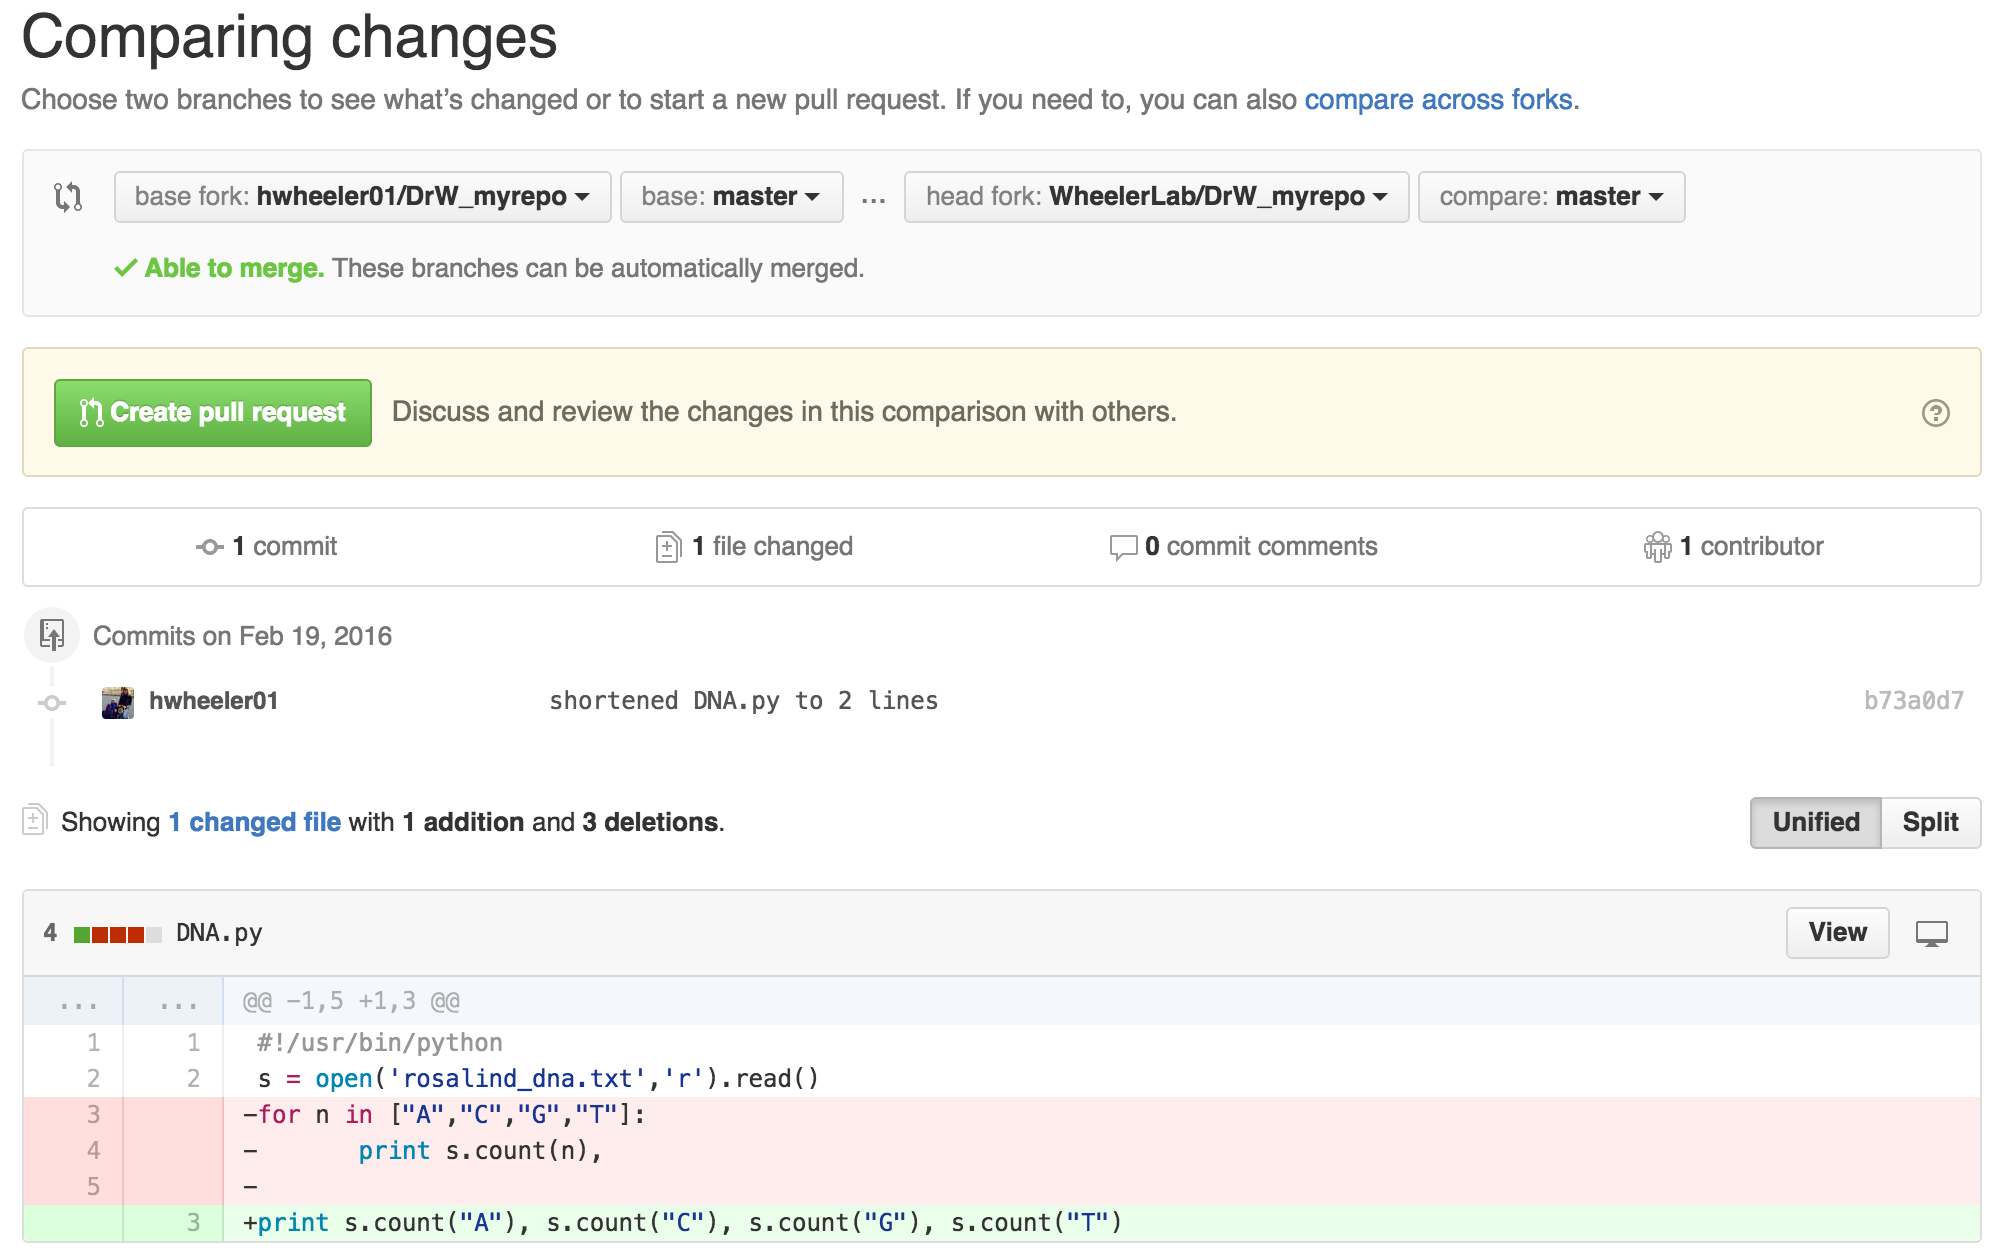
Compare files at GitHub. Go to your forked DrW_myrepo repository and click the green button “New pull request”. This will take you to a page similar to the screen shot below comparing the differences between the two forks:
- base fork
hwheeler01/DrW_myrepo - head fork
YOUR-USERNAME/DrW_myrepo
Click the green “Create pull request” button and add a brief message about what you changed:
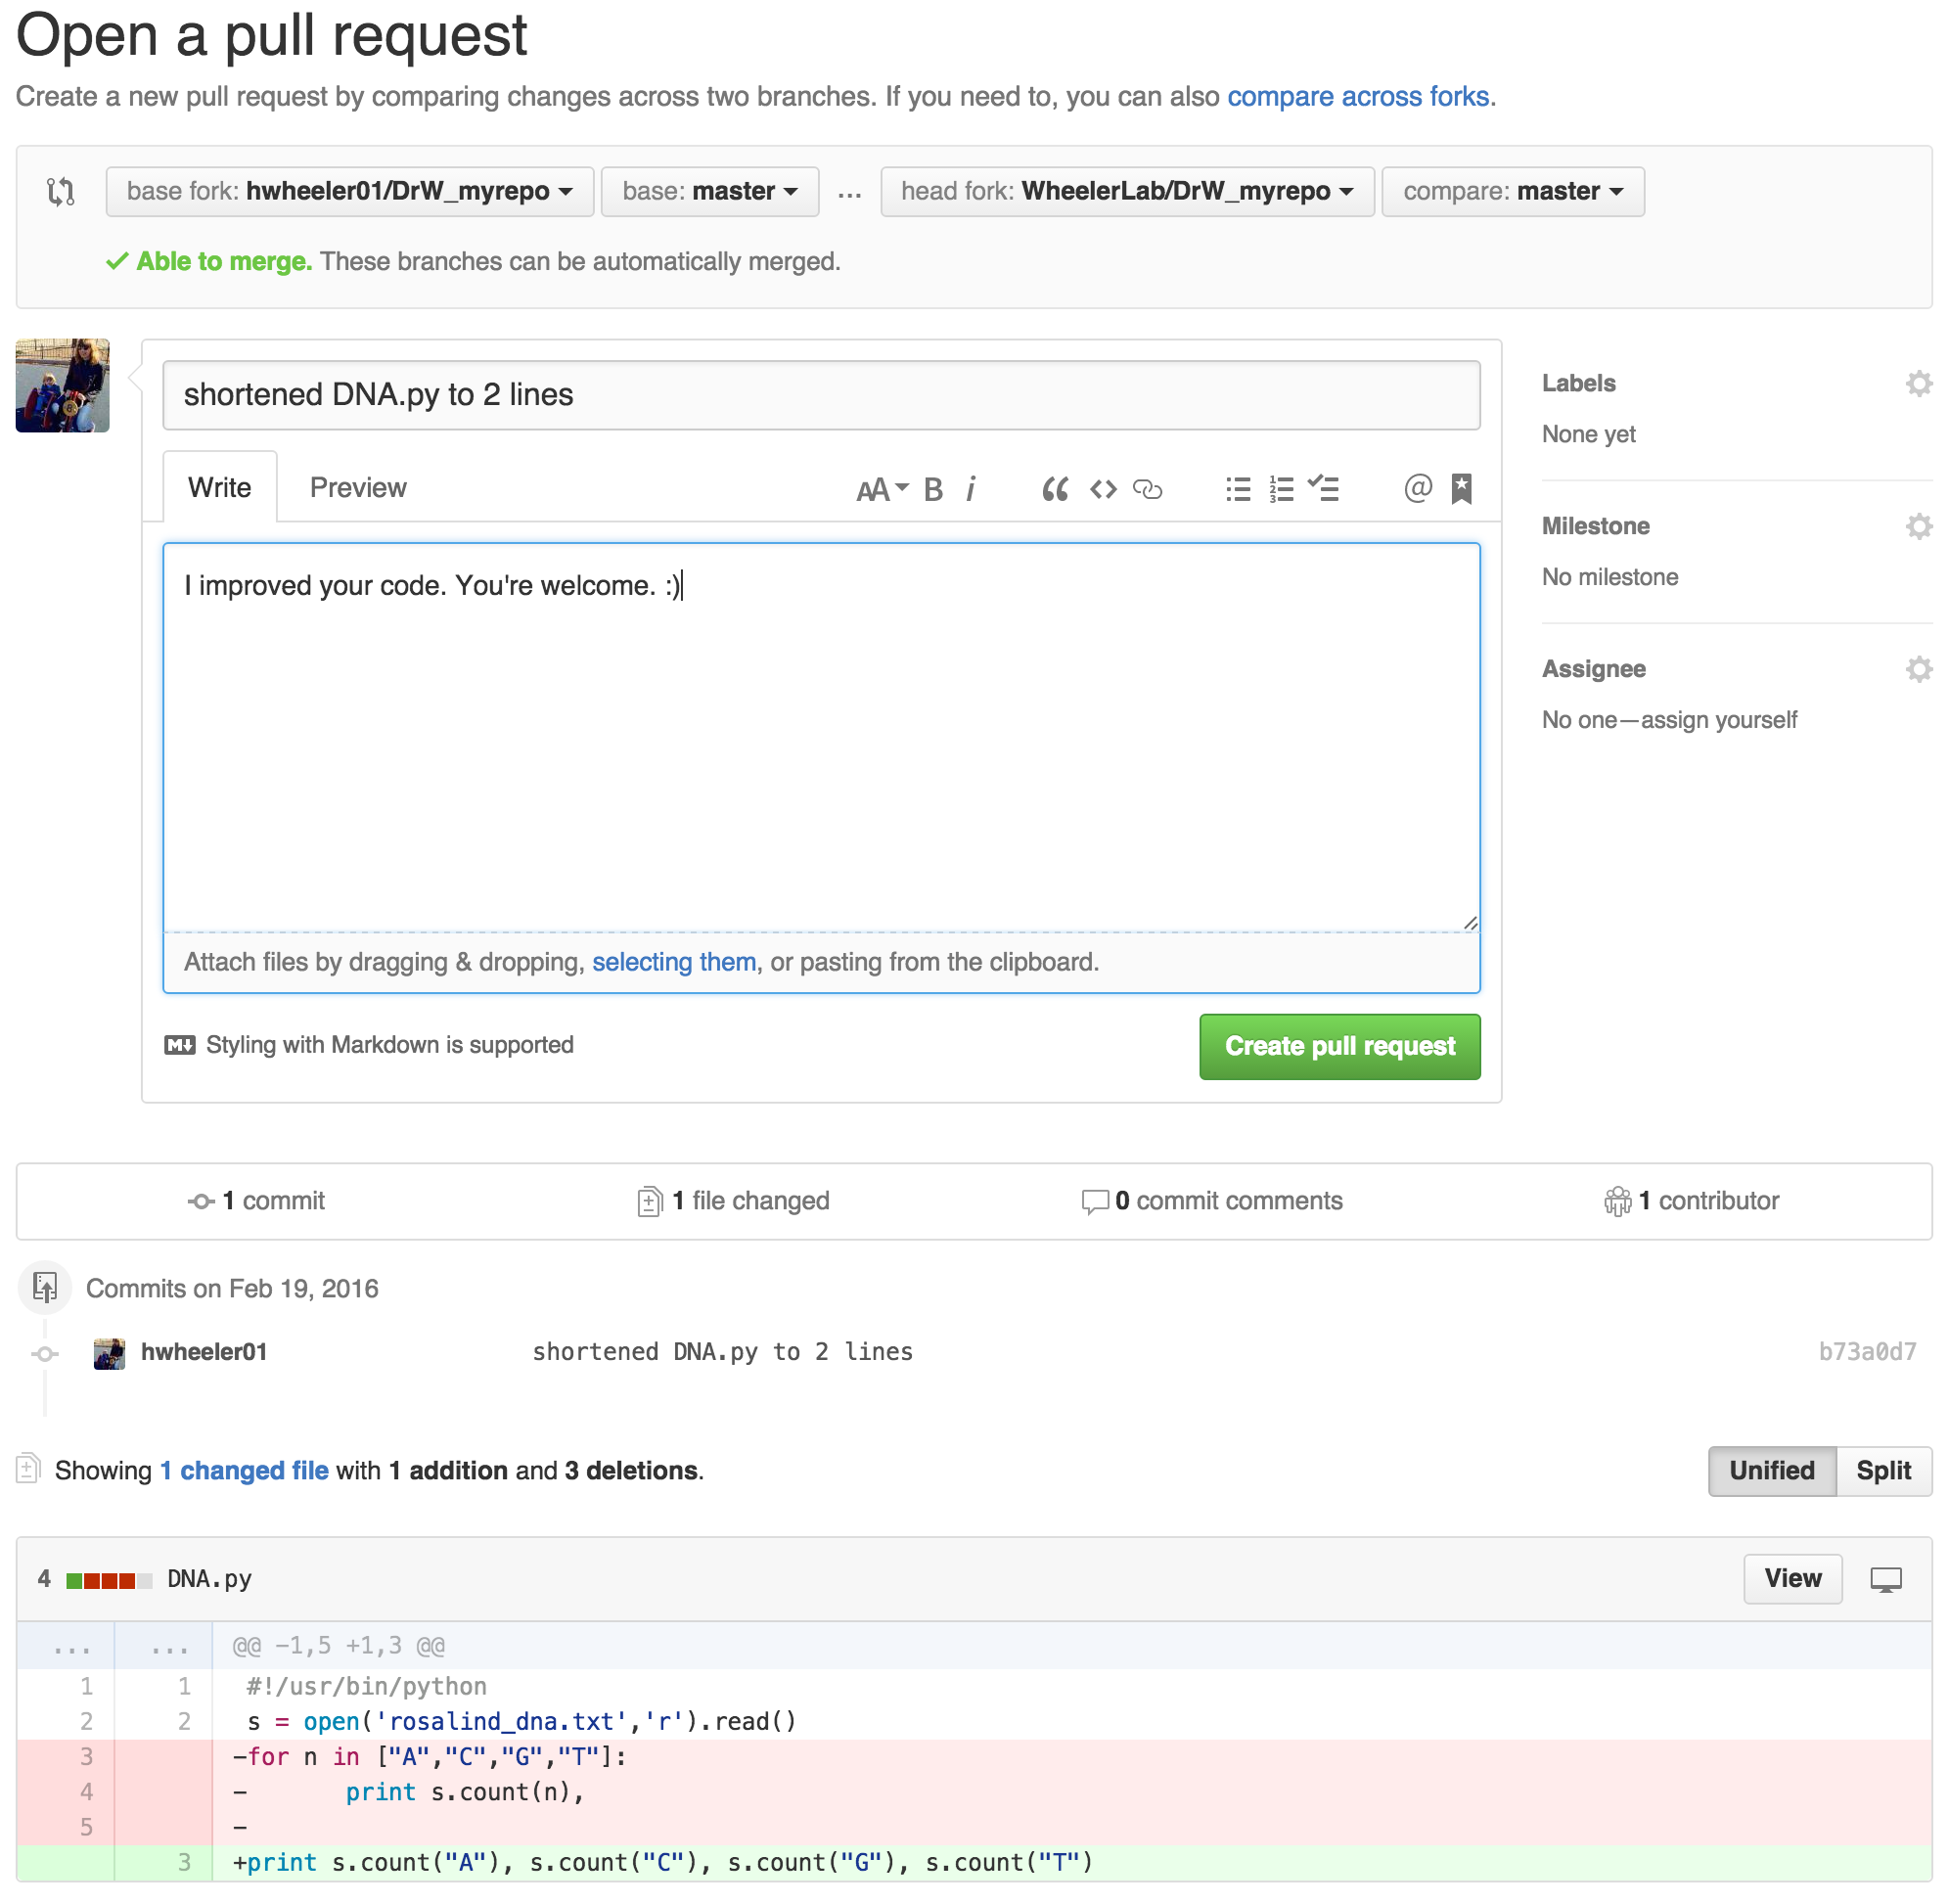
Then, you guessed it, click the green “Create pull request button” one more time and a pull request will be sent to Dr. Wheeler (or, when working in your groups, your primary repository owner).
Now she will decide if she likes your change and click “Merge pull request” if she does or “Close pull request” if she doesn’t:
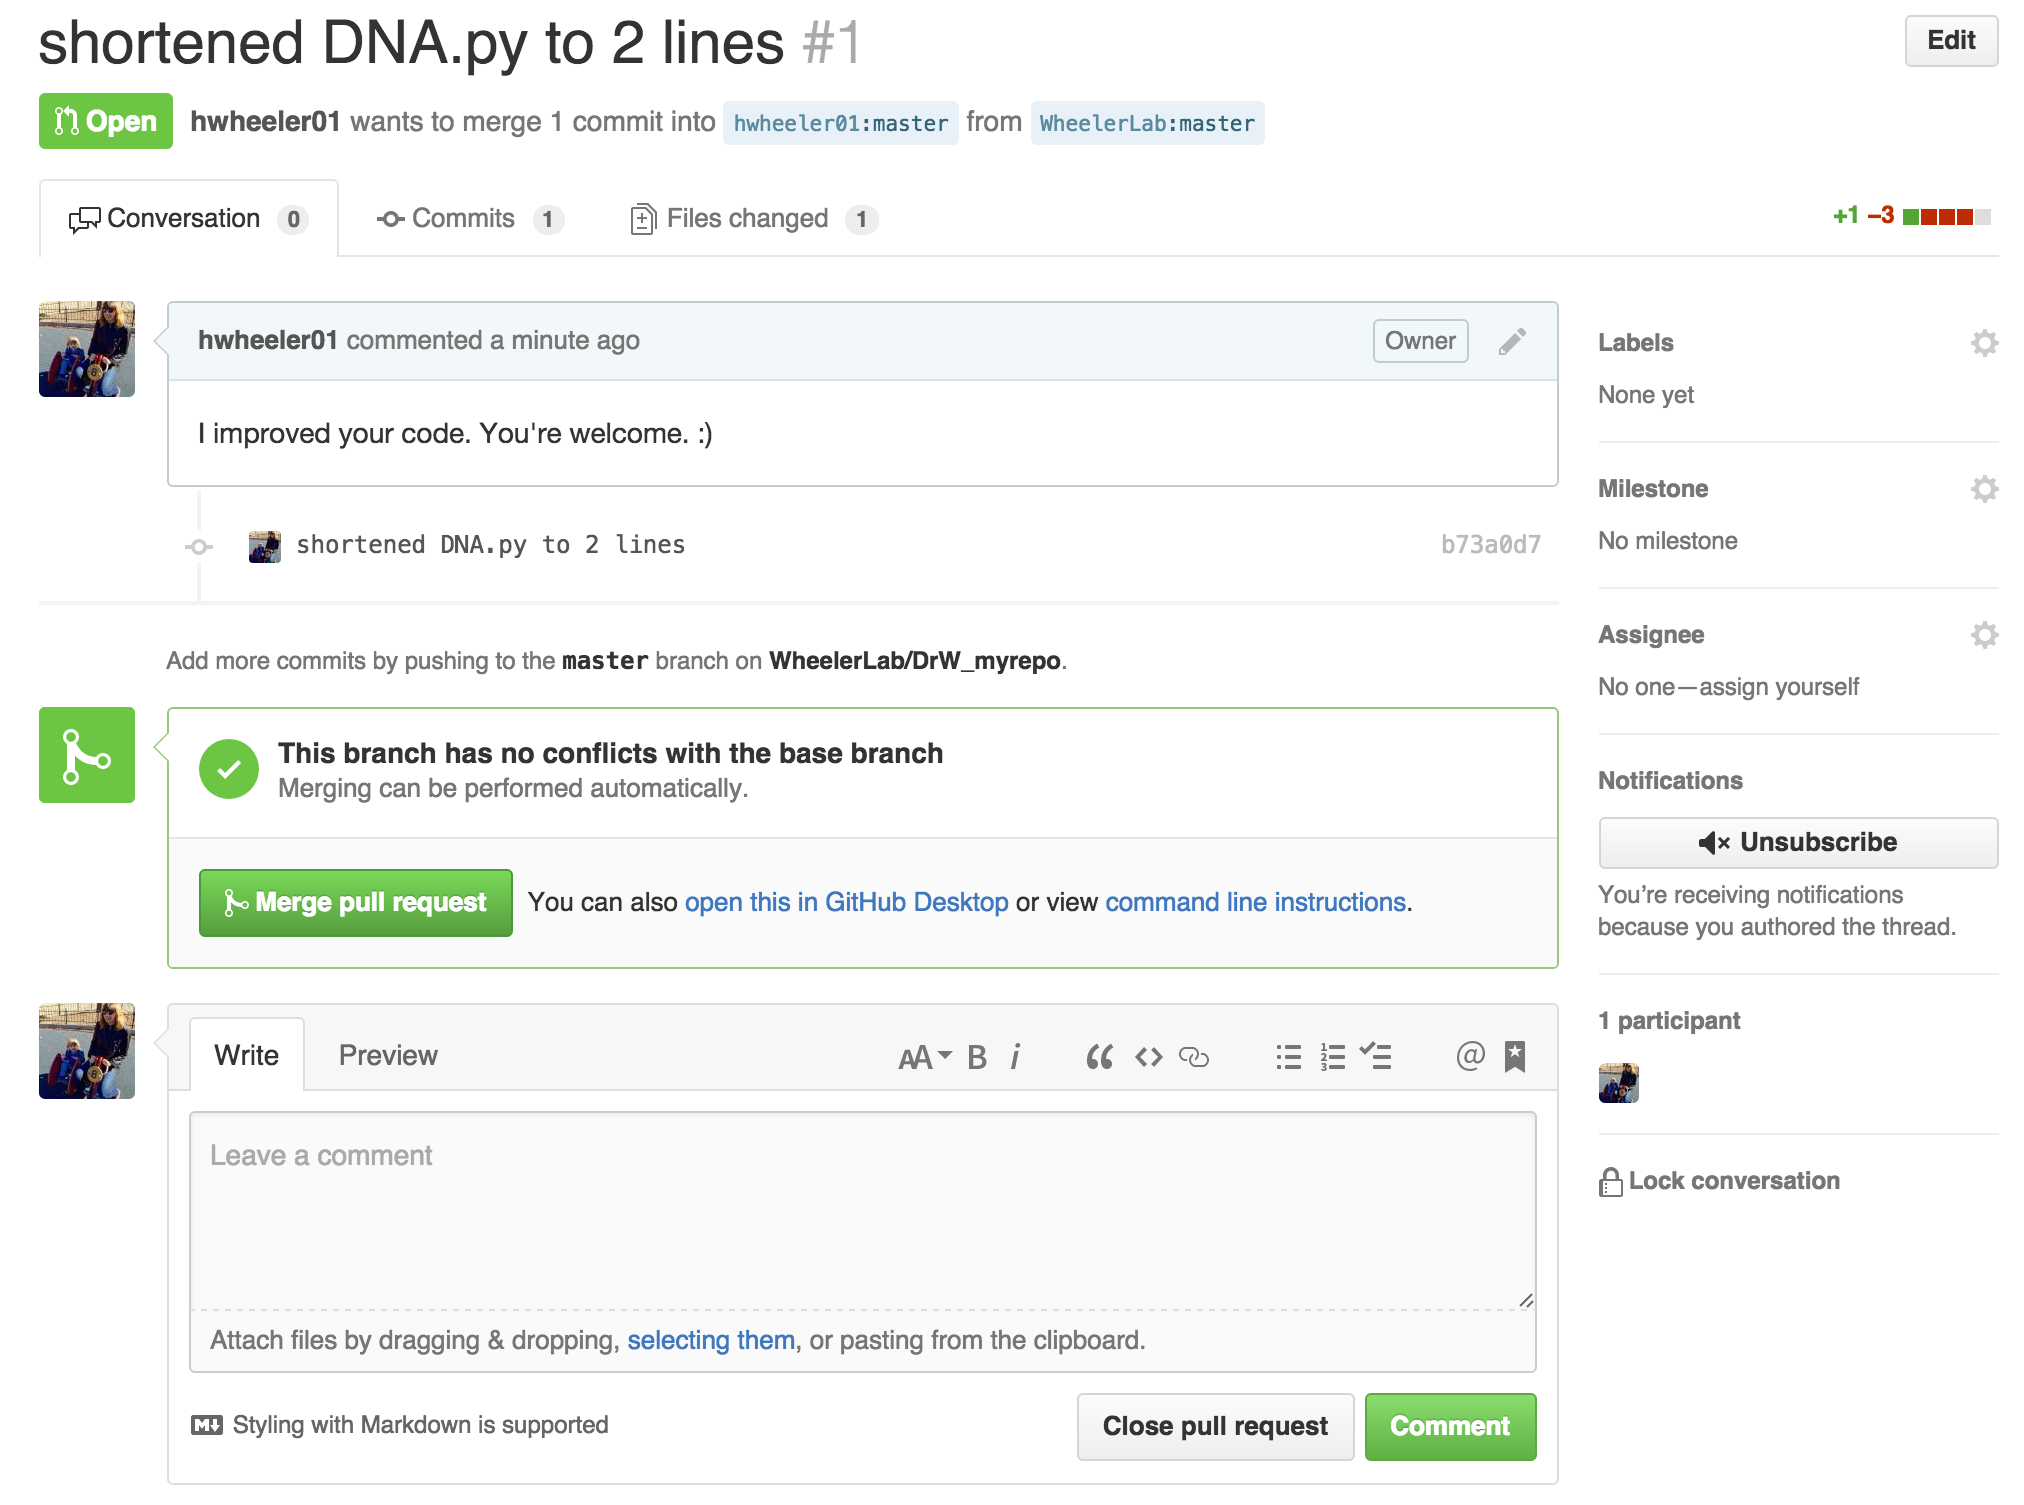
For more details on creating and merging pull requests:
https://help.github.com/articles/creating-a-pull-request/
https://help.github.com/articles/merging-a-pull-request/
9. Other useful information
-
Try to organize your work so multiple group members aren’t working on the same file (or the same portion of the file) at the same time, but here’s what to do if you have a merge conflict.
-
Once you get the hang of git add/commit/push, you may want to try branches. Branching means that you take a detour from the main stream of development (master branch) and do work without changing the main stream. Git encourages workflows that create small branches for exploration or new features, often merging them back together quickly. See here for the basics of branching and merging.
-
Don’t push large files to GitHub (>50 MB). If your project requires large input files, talk to Dr. Wheeler about options for storing them. See GitHub’s policy for more info.
-
In addition to storing and tracking all your code, use GitHub to store key journal articles, your presentation slides, and test input files.
-
Additional Git and GitHub resources are posted here.
-
Most of all, don’t get discouraged if things go wrong. The Git learning curve is steep. https://xkcd.com/1597/

KEY POINTS:
-
Add and commit new scripts and other small files throughout your coding session.
-
Always push everything at the end of a session so your GitHub repository is updated with your new work.
-
If you make an edit on the GitHub website itself, be sure to do a
git pullbefore you resume working on your local files. -
At the beginning of a coding session, always do a
git pullto make sure your local files are up to date. If your repo is a forked copy, also sync with the upstream repo before making changes.